15
Dec
2022

In this tutorial we are going to learn how to use the free version of WP Package Editor (WP2E) to integrate the AWS Translate Service into a WordPress Plugin Boilerplate.
The core functionality of WP Package Editor (WP2E) is to create and manage installation packages to quickly deliver and maintain a set of interdependent WordPress scripts such as themes and plugins from a single dashboard.
The platform provides 3 types of resource:
In order to test the service, the free starter plan allows to create one WP Boilerplate Starter with unlimited dependencies together with one WP Package Installer to deploy public or private repositories in production.
Let’s start our project from the WP Boilerplate Starter by Hugh Lashbrooke aka. @hlashbrooke (see the Github repo in footnotes).
A word about Hugh’s template before we start. We picked this code template among others because it is standards-compliant and we have already used it for dozens of projects.
If you wish to test the service with another open-source Boilerplate feel free to contact us and we will add it to the template gallery.
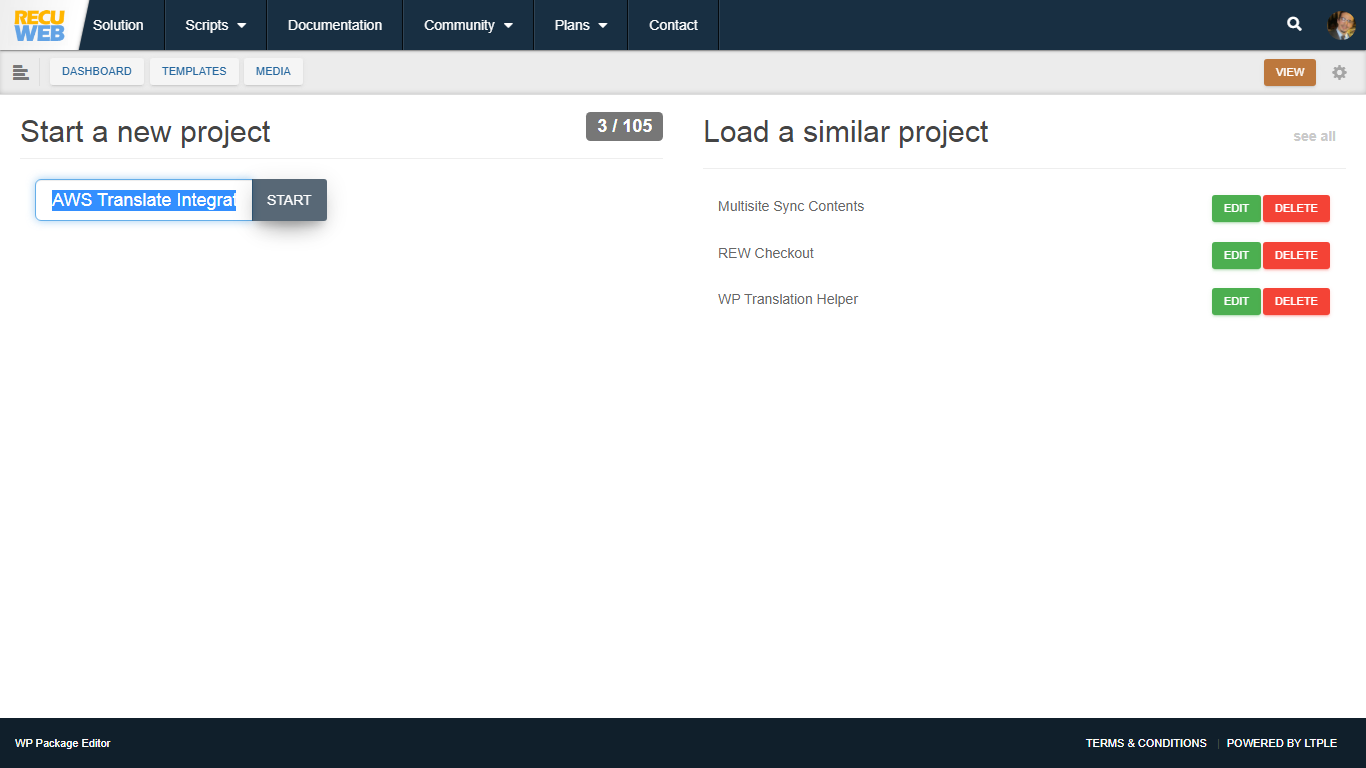
1 – To start a new project click the blue button “+ New Project” in the top right corner of the dashboard and select “WP Boilerplate”.
2 – Click “Start” under your favorite Boilerplate template, in this example hlashbrooke/WordPress-Plugin-Template.
3 – Give a name to your project and click “Start”


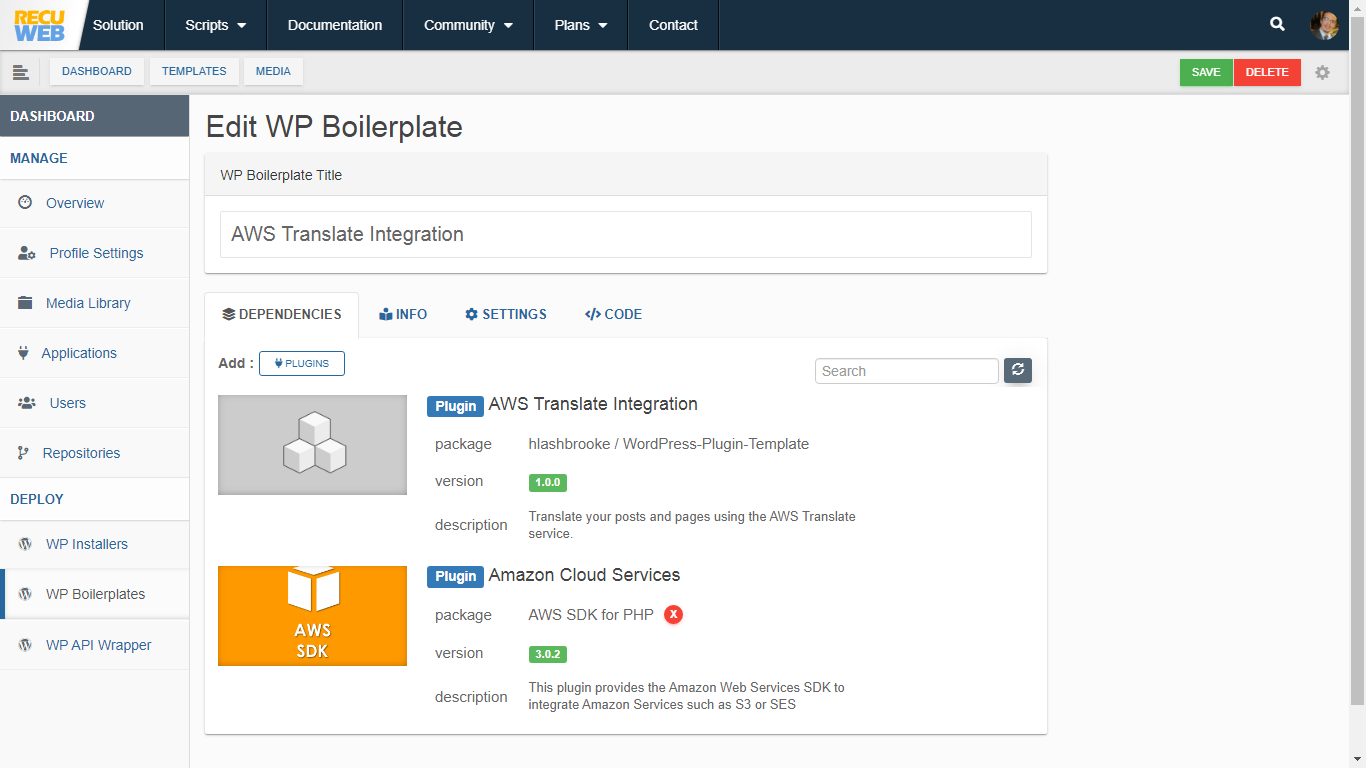
Before starting to code our plugin we need to integrate the AWS SDK into the newly created boilerplate via an WP API Wrapper.
WP API Wrappers usually do not perform any tasks after being activated, as such it is up to you to integrate the SDK’s classes and methods into the boilerplate plugin.
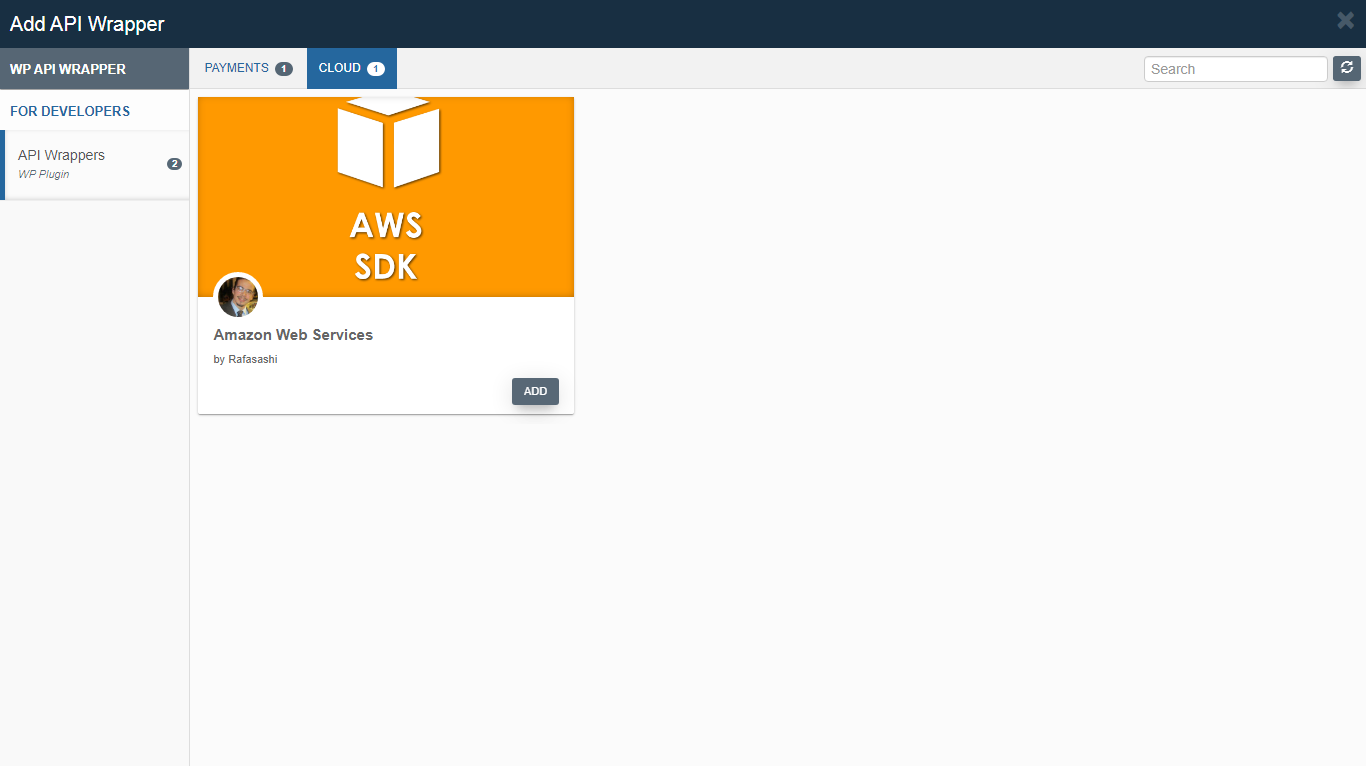
1 – Click the button “+ API Wrapper” under the project tab named “Dependencies”
2 – Select the Gallery called “Cloud” to see all the SDK’s related to Cloud services such as AWS, Google or Azure.
3 – Click “Add” under the required SDK and close the dialog box with the cross. If you don’t see the newly added script in the list of dependencies click the circular refresh button in the corner of the tab.

Note: If your project requieres an additional plugin such as WooCommerce, repeat these steps by clicking on “+ Plugins” instead of “+ API Wrapper” and select the dependency from the gallery of open source plugins.
Now that we have listed all our dependencies we need to customize the boilerplate by modifying its default settings.
The main point of using the WP Package Editor (WP2E) when starting a new dev project is to take advantage of the automated actions.
The tool uses both the project information and settings to perform a set of automated actions on top of the repository such as:
1- In the next tab called “Info” fill the plugin information to be used to generate the readme.txt
2 – Moving to the next tab called “Settings”, fill the names of files, functions and classes to be used during the auto renaming. It is important to follow the model given by the text input placeholder and to keep the naming as unique as possible.
3 – Moving to the tab called “Code”. Check the “Installer” option to deploy both Boilerplate script and dependencies locally. Uncheck it if you only need the Boilerplate script. As soon as you hit the “Download” button, the current settings will be auto saved and the plugin will be dropped into the download list of your Browser.


Note: At this stage the archive only contains the auto generated boilerplate without the previously selected dependencies. For the dependencies to be deployed in production you will need to commit the script to a 3rd party repository provider such as Github and integrate it with a WP Package Installer.
Now that we have created our package installer we are going to deploy the Boilerplate script and its dependencies in a dev environment.
1 – Make sure you keep the “Installer” option checked when downloading the archive from the previous steps.
2 – Install the package installer archive in you plugins and activate the script.
3 – Click the new “Dependencies & Licenses” link under the section Plugins of the admin dashboard. You should see 3 elements:
4 – Install and activate all missing scripts.


Note: The package installer can be deleted once all dependencies are successfully installed
Now that we have installed the boilerplate project and the AWS SDK dependency we are ready to modify the starter script with some useful functions.
To translate a string using the AWS Translate service, you will need to have at least the translate:TranslateText action in your IAM policy.
AWSTranslateTextHere is an example of an JSON policy that grants the minimum permissions required to translate a string using the AWS Translate service:
{
    "Version": "2012-10-17",
    "Statement": [
        {
            "Effect": "Allow",
            "Action": "translate:TranslateText",
            "Resource": "*"
        }
    ]
}
This policy grants the translate:TranslateText action on all resources, which allows the user to translate a string using the AWS Translate service.
Note that the AmazonTranslateFullAccess policy includes permissions for all actions in the AWS Translate service, so if you attach this policy to a user, they will have more permissions than just the translate:TranslateText action.
It is generally a good practice to grant the minimum permissions required for a user to perform their tasks. This helps to reduce the risk of unintended actions and increases security.
To get an IAM user access ID and key that you can use to authenticate the AWS SDK for PHP in your script, you will need to do the following:
AmazonTranslateFullAccess policy.Here is an example of how you can test the Translate client from the AWS SDK for PHP to translate the phrase “hello” from English to French:
use Aws\Translate\TranslateClient;
use Aws\Exception\AwsException;

$client = new TranslateClient([
    'region' => 'YOUR_AWS_REGION', // eg. us-east-1
    'version' => 'latest',
    'credentials' => [
        'key' => 'YOUR_AWS_ACCESS_KEY_ID',
        'secret' => 'YOUR_AWS_SECRET_ACCESS_KEY',
    ],
]);

try {

    $result = $client->translateText([

        'Text' => 'hello',
        'SourceLanguageCode' => 'en',
        'TargetLanguageCode' => 'fr'
    ]);


    echo $result['TranslatedText'];
}
catch (AwsException $e) {

    echo $e->getMessage();
}
This example will output the translation of the word “hello” from English to French, which is “Bonjour”.
If an error occurs while calling the translateText operation, it will throw an AwsException, which will be caught in the catch block. You can then print the error message or handle the error in some other way.
To complete the code snippet, we need to replace YOUR_AWS_REGION, YOUR_AWS_ACCESS_KEY_ID and YOUR_AWS_SECRET_ACCESS_KEY with data collected via the plugin settings.
To begin, we will add a submenu to the plugin section of the AWS SDK API Wrapper identified by the slug acs_plugin_panel.
To do this, locate the private function called menu_settings() in the plugin boilerplate and replace it with the following function:
private function menu_settings() {

	return apply_filters($this->base . 'menu_settings', array(

		'location'    => 'submenu',
		'parent_slug' => 'acs_plugin_panel',
		'page_title'  => __( 'Amazon Translate', 'your-plugin-slug' ),
		'menu_title'  => __( 'Amazon Translate', 'your-plugin-slug' ),
		'capability'  => 'manage_options',
		'menu_slug'   => $this->parent->_token . '_settings',
		'function'    => array( $this, 'settings_page' ),
	));
}We can now add 3 setting fields to the newly created submenu in order to collect YOUR_AWS_REGION, YOUR_AWS_ACCESS_KEY_ID and YOUR_AWS_SECRET_ACCESS_KEY.
To accomplish this, locate the private function called settings_fields() in the plugin boilerplate and replace it with the following function:
private function settings_fields() {

	$settings['settings'] = array(
		'title'       => __( 'Amazon Translate', 'your-plugin-slug' ),
		'description' => __( 'Client configuration', 'your-plugin-slug' ),
		'fields'      => array(
			array(
				'id'          => 'aws_region',
				'label'       => __( 'AWS Region', 'your-plugin-slug' ),
				'type'        => 'text',
				'description' => '',
				'default'     => '',
				'placeholder' => __( 'eu-west-1', 'your-plugin-slug' ),
				),
			array(
				'id'          => 'aws_key',
				'label'       => __( 'Access Key', 'your-plugin-slug' ),
				'type'        => 'password',
				'description' => '',
				'default'     => '',
				'placeholder' => '',
			),
			array(
				'id'          => 'aws_secret',
				'label'       => __( 'Access Secret', 'your-plugin-slug' ),
				'type'        => 'password',
				'description' => '',
				'default'     => '',
				'placeholder' => '',
			),
		),
	);

	$settings = apply_filters( $this->parent->_token . '_settings_fields', $settings );

	return $settings;
}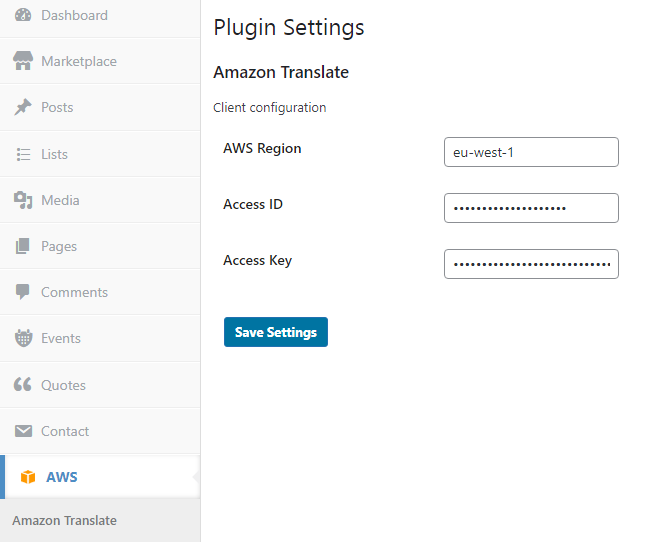
Fill in the 3 setting fields and collect the data using the get_option() function :
$region = get_option('plugin_prefix_'.'aws_region',false);
$key = get_option('plugin_prefix_'.'aws_key',false);
$secret = get_option('plugin_prefix_'.'aws_secret',false);
In the translation script replace YOUR_AWS_REGION, YOUR_AWS_ACCESS_KEY_ID and YOUR_AWS_SECRET_ACCESS_KEY by $region, $key and $secret respectively.
From here it will be up to you to integrate the translation tool into your workflow, but feel free to share your thoughts with us using the comments below or privately through the contact form.